Pages

Showing posts with label Camera Settings. Show all posts

Wednesday, October 21, 2015

My Fall DIY Projects


Phewwww!!! Finally finished it! This fall project took me like 3 weeks to complete cause I had to make several trips to the Dollar Store and crafts store. Getting to the point where I was starting to get a hard time finding what I wanted because they were already putting away the Fall decor and putting up the Christmas stuff. I'm so proud of myself though. I'm really happy and loving each of these projects.

These fall leaves candle holder were super easy to put together. I got the glass holders from the dollar store. The leaves came in a bunch and were also from the dollar store. All I did was hot glue them to the holder and used a ribbon and tied a bow right in the middle. It looks so glowy and pretty at night with a tea light candle in it.


I bought these fake pumpkins from Michael's. They came with a metallic finish, which is awesome cause I dig it and I don't have to do the paint job. What I did have to do is adorn them with swirly crystals and pearls. The crystal swirls were peel and stick and I got them from Micheal's also. I highly recommend those rather than free-hand sticking them one by one, especially if you're not very crafty or don't have the patience like I do. For the pearled pumpkins, I bought a sheet with different size half pearls, peel and stick also from Michaels. I did struggle with the tiny little pearl cause they were a lot harder to peel and stick where you want them to go. But the efforts were worth it. It turned out amazingly beautiful and fancy looking!


The next project that took me a little while to assemble was this pumpkin fall flower bouquet. I bought the pumpkin from the dollar store but they were only available in orange so I bought some white paint and painted them white. I also had to cut a 3 inch hole on top of the pumpkin. After the paint dried, I use some lace fabric and wrapped the pumpkin and tied it together with some polka dots ribbon. 
Because the pumpkin was light and made of Styrofoam, I added a few marble inside the pumpkin to give it a bit of weight. Lastly, I purchased several different bunch of flowers from the dollar store and put them together to create this pop of fall color. So pretty! You can definitely switch up the flowers according to the season and reuse the lacy pumpkin. 


This fall branch center piece was my last project. I got a pack of fake leaves from the Dollar General store and hooked them unto some Christmas ornament wires and hung them on the branches. I reused the branches I purchased last winter for my Christmas project. They are super pretty and sparkly. I filled the vase with cinnamon scented pines and added a blow. I also reused the led lights from my previous winter project to brighten up the branches. I don't know if you can see but I have a few birds on the branches. I got them from the dollar store as well.


I got this Jack-o-Lantern at TJ Maxx and you can put a candle inside it. I also bought a couple Jack-o-Lantern at the Dollar store. They light up with different color, which is pretty cool for Halloween. I also bought a couple candles from Bath and Body Works. OMG they smell so dang goooood! I also got a couple other candles from TJ Maxx. Also bought lots of fall scented wax melt from Micheals. They were really cheap and on sale and also smell so good. I love the smell of fall...Apple, cinnamon, pumpkin, spices, ahhhhh so comforting!


Got this candy bucket from TJ Maxx for like $8. I filled it up with candies last night and the next day it was almost empty. Had to yell at my kids for going through them so fast! This bucket can probably hold a gallon and a half of water. The Trick or Threat tombstone was on sale at Micheals for a couple bucks.


This vase center piece set is super easy to do. I got the vases from the dollar store. I filled them up with marbles and added a few flower stems (red, white, and yellow for mines). Fill the vase with water and top them with a floating or tea light candles and you're done! It's that simple. The finished look is so elegant, warm, and cozy. 


I have a glass top coffee table, which is awesome and reflective so when I came across some bright orange string lights from Walgreens for $5 I was thinking hmmm, I could do something with these! I looped them underneath the glass and it looks glowy and Halloweenish and just makes my living room even cooler and cozy. 

Last but not least, my tips for taking pictures at night is using a wide aperture lens and setting. I used the canon 50 mm f 1.4, which did a fantastic job. Most of these shots were at f 2.8 and I usually go with AV or A-Dep mode just cause I ain't got time for manual configuration, lol. A tripod is also a must for sharpness since the camera needs a slower shudder speed to absorb all that light. I use a 2 second timer setting to minimize camera shake while I snap the pictures.

Whew...now that I'm done with my fall project, it's time I start thinking about my winter projects, lol...OMGosh Pang...stop it already! smh. Not only am I enjoying doing them. I love the ambiance it gives the living room and I love taking pictures of them so I can show off my projects and hopefully give you some inspiration or ideas.

Have a happy fall and a marvelous and safe Halloween!


Monday, January 7, 2013

How To Camera Shooting Mode for Canon Rebel T3i


Aside from learning what buttons to push, another important thing you need to know is how to select the shooting mode.
Settings from A-DEP to P are your creative modes, which means they allow you to do some custom settings based on your surrounding and the type of shoot you're going for.
Settings from A+ to Night Portraits are the basic shooting modes. They don't give you the flexibility that the creative modes do. These are fully automatic and preset on your camera so you will give your camera the power to make those judgment calls. Honestly, from my experience, you shouldn't always trust or rely on the camera to make these adjustments for you. Yes, sometimes it gets it right but you will always get the best result when you do your own custom settings.

Even if you don't own a DSLR camera, most digital camera nowadays do offer a variety of shooting mode and that will vary from one camera to another. It's essential to understand what each mode allows you to do so that you can make an informed decision on which ones to select for your image in order to get optimal result.

A-DEP (Auto Depth of Field) - This mode will allow you chose what you want in focus. The camera will choose the shutter speed and aperture to keep your point of focus sharp and your background blurred. You can choose your ISO and exposure compensation.

M (Manual) - This allows you to have full control over the camera. This mode works best for people are comfortable adjusting their own settings and ideal for advance users.

AV (Aperture Value) - Allows you select the aperture but the camera will adjust the shutter speed for you. Ideal for putting your subject in focus and blur the background.

TV (Time Value) - also known as shutter priority. This mode allows you to choose the shutter speed but lets the camera select the aperture depending on how much light is coming through the camera's sensor. This is ideal for shooting fast moving subjects or for long exposure shots.

P (Program) - Partially automatic. Camera will chose aperture and shutter speed but still allows you some flexibility and to change certain settings such as your ISO, white balance, and exposure compensation.

A+ (fully automatic) - the camera will select and adjust the aperture, shutter speed, and ISO for you. This mode is for people who are new and not very comfortable with adjusting their own settings. Occasionally, if your camera feels like flash is needed, it will automatically fire the flash as well.

No Flash - Automatic but without flash.

CA (creative auto) - this mode lets the camera make automatic adjustments for you but also allows you to adjust the aperture and choose the color tone that you want for your images. I pretty much never use this setting and didn't quite figure it you until recently, lol.

Portrait - camera will select wide aperture and auto correct your skin tone so that it looks more natural.

Landscape - camera will change to a smaller aperture and which will give you a wider depth of field so that everything is in focus. It will also auto adjust saturation of the blues and greens to make them more vivid.

Macro - allows you to take sharp close up shots. I see only a very slight difference in sharpness when I shoot in macro mode and it may have something to do with the lens. I think you would need to pair the macro mode with a macro lens in order to get a true macro picture. One thing that really annoys me when shooting under macro mode is that sometimes the camera feels that there isn't enough light so it might fire the flash unexpectedly.

Sport - ideal for shooting fast moving subjects. The camera will auto adjust to allow you to capture the moment. If you leave your finger on the shutter, it will continuously shoot until you release.

Night Portrait - this is for night portraits and the camera will automatically determine what aperture, shutter speed, and ISO is needed. Whenever you are shooting at night or with a slow shutter speed, you absolutely need a tripod in order to avoid blurry images.

Video - for shooting videos.

Once you get more familiar and comfortable with these shooting modes, you will be able to determine what works best for you. Personally, I rarely use the basic modes and the only one I've mostly used there is the Macro mode. Otherwise, I'm always switching around between the creative modes and honestly, the best way to go is Manual because you have full control over your camera. It can be intimidating and frustrating when you don't know what you're doing and which buttons to push but you'd be surprised how much you'll learn through trial and error.

Hope this was helpful. What mode do you typically go for and why?

Luuux Shared Link


Saturday, December 29, 2012

Canon Rebel T3i - What Are All These Buttons and What Do They Do?


With a DSLR cameras, you have at your fingertips much more options to choose from to help you get the perfect shot. A better camera doesn't necessarily means that you will automatically take better pictures. You need to understand all the functionality and the capability of your camera in order for you to maximize the quality of your images.

So I'm going to briefly going over the buttons on the Canon Rebel T3i. The first time I got my hands on it, it was a bit intimidating trying to figure out what is what and if you are like me, you probably won't look at your manual, lol, but figure things out through trial and errors.

Even though you don't have this particular model, I think most Canon DSLR cameras have very similar buttons. In future posts, I will go a bit more in depth with the camera settings and give you tips I learned.

On/Off - This is pretty self-explanatory and use to turn on or off your camera.
Shooting Mode - Each of these shooting modes serves as a purpose and you typically would pick the one that works best for you.
DISP. - To turn on and off the display on your LCD screen. I rarely touch this button so I don't know what else it does beside that.
ISO - use this button to select your ISO based on your lighting and camera settings. I use this a lot.
Left/Right Scroll - This is to mainly move your selection left or right on your menu screen.
Shutter - press half way to allow your camera to focus and then completely to take the shot.


MENU - To access your camera's menu
INFO. - gives you several options on what info you want to display your LCD screen
LCD/View Finder Display - allows you chose to view on your LCD screen or through the view finder.
Exposure Lock - I haven't quite played with this feature but it is supposed to lock the exposure on a certain area and allow you to recompose the image and keep that exposure the same. This button will also allow you to zoom out from a picture during preview.
Auto Focus Point Selector - choose which points you want in focus or this can also be used to zoom in our pictures during preview.
AV - allows you to select the aperture
Quick Menu - allows to change some settings quickly without having to go through the MENU.
WB - allows you to select  your white balance.
Drive Mode - single shooting, continuous shooting, or self-timer options.
AF - Auto focus mode
Picture Style - allows you to select a pre-defined picture style, which will alter the color, saturation, contrast, and sharpness of your image.
SET - use to select the settings you want.
Preview - allows you to see the pictures or videos after you have taken them.
Delete - allows you to delete the pictures you don't want.


AF/MF - let's you choose to auto-focus or manual focus.
Image Stabilizer - helps reduce camera shake and blurring in pictures.
Focus Range - let's you know the focusing length that your camera is using.
Flash - This button with force the flash to pop up. Some shooting mode won't allow you to force the flash.
Lens Release - allows you to remove your lens from the camera.
Depth of Field Preview - allows you to view in real time the depth of field of your image.


So this is it for my quick take on the camera buttons. I hope this was helpful in some ways. I think my next project, would be to go over the shooting modes.


Saturday, December 15, 2012

Photography Tips: Why You Should Set Your White Balance


I wished I had discovered this tip sooner but surprisingly, this is new to me, lol. Anyways, this is a tip that is so simple yet very effective and you will see a significant improvement in the quality of your pictures. Getting the right lighting is tremendously important when you want your pictures to look good. The second thing you need is knowledge of what you can do on the camera before you take the shot. If your picture is nearly perfect from the getgo, you will likely not have to do much editing afterward so prepping for the shot will save you a lot of time by improving the quality of your picture.

As you can tell from the picture above, the image on the left was taken in my bathroom under incandescent light and auto white balance, which causes the colors to look yellow. The image on the right has been color corrected by customizing the white balance. By the way, the images above were taken with my Sony Cybershot DSC-WX9. I think pretty much any digital camera on the market comes with this feature. Setting or customizing your white balance will remove the wrong colors or hues from your shot so that you get colors that are more accurate to what you see with your own eyes. Pretty amazing eh?!!! Believe me, I was stocked when I figured this out.

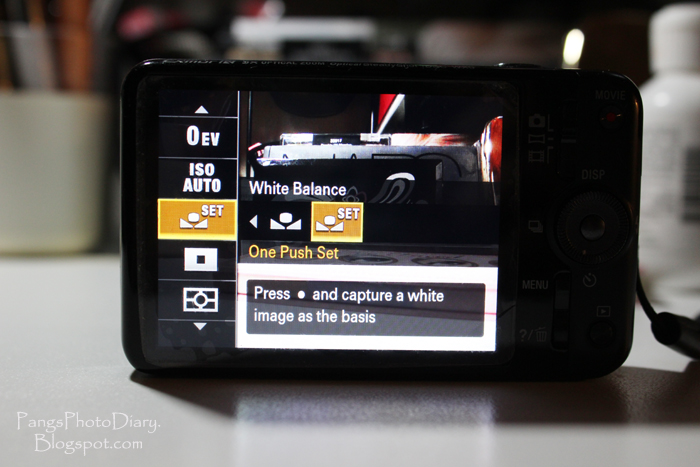
Please check your user manual on how to set/customize your white balance as there is variation within the brand and camera. But for now I'm just going to show you how I customize my white balance on the Sony Cybershot DSC-WX9 and Canon Rebel T3i so that you can see how simple it is to do. Heck, you may even figured out how to do that on your camera just by reading this.

Your camera will come with some factory set white balance options. The typical ones are auto, daylight, cloudy, fluorescent, incandescent, and lastly the custom white balance. You would use any of these to get the hues you want but my favorite of all of these is the custom. It will get you the most color correct possible, if that is what you are going for. Ok, I admit that auto white balance has been the option I've used 99% of the time within the past decade. Thinking about it, how many of you only use auto white balance? I'm willing to bet that unless you are a professional photographer or an amateur, you were probably using auto most of the time too.


For the Sony Cybershot DSC-WX9, go to Menu and select WB Auto and move your selection to the right until you reach the option that allows you to set your white balance. Once you are there, you must point your camera to something white, such as a piece of paper or whatever white you have under the lighting that you are in. Once you have your camera pointed to that white stuff, all you gotta do is press the set or selection button and your camera's sensor will auto correct the colors of your surrounding.

Back to the first picture above, notice the result I got on the right image from setting my white balance. All that yellowness is gone! It's so easy I'm actually mad at myself for not making use of this sooner. But if you were clueless like myself, you are going to love the results once you've figured out how to customize your white balance.


How to set your white balance on the Canon T3i:

1. Take a picture of a white piece of paper or surface, like pictured above.
2. Go to Menu and custom white balance
3. You'll see the white picture you just took, select it
4. A pop up window will ask you if you want to use the white balance from that image and you want to select OK.


5. When you are in your picture setting, you'll want to change the AWB (auto white balance)
6. Push the WB button on the right to go to custom white balance
7. And select it.


8. You know you have selected your custom white balance when you see that icon I circled in red above.
9. You can then return to your LCD screen live view or view finder to start shooting.


There is a little bit more steps involved with the T3i but it's not as complicated as it may seem and once you get the hang of it, you'll find it really easy. 

So there you have it...Simple and effective way of getting the right colors under any lighting you are in!

How many of you didn't know about this until now? If this is new to you, please try it and let me know how it changed your life...or your pictures, lol. I was saying to myself  "crap, all these good shots I could've gotten right with just manipulating my camera setting!"

Getting an expensive camera doesn't mean that all your pictures will come out perfect automatically. YOU, as the photographer, compose the image. The camera only does what you ask it to do.


Luuux Shared Link